Simon Frankau's blog
Electronics for Newbies: SMD soldering
Well, it's been some time since the last update, so I thought I'd put a rambling in. Having exercised all the infrastructure I'd built, I've found only one (not terribly unexpected) flaw: I haven't debounced the reset and NMI buttons. Reset isn't a problem - a few resets back to back are fine. NMI is slightly annoying, as the next NMI may start before the previous completes, perhaps even before the register state is properly saved. Oh, and ideally, of course, one button press would lead to one NMI! Still, NMIs aren't core to my plans so I'll live with it until I think of a nice way to stick a little debounce in.
Otherwise, looking back, I reckon the ability to read the current state of the memory banking configuration is overkill. Any software tweaking the mapping can track the state itself. But hey, it's only one chip to implement. On the other hand, if I admit it's overkill, then the read-only RAM mappings are overkill too, really, and indeed I should probably say that the whole banking thing is overkill. All I really need is circuitry to disable ROM and have a full 64K of RAM, and everything else is probably excessive. So, let's just say it was worth it for the fun.
Then I took a break from this Z80 project to learn some surface mount. It's pretty clear now that veroboard is not nice for complex circuits, and I'll want to do proper PCBs in the future. However, why stop at through-hole PCBs? Surface mount is very popular with hobbyists nowadays, and all the funkier stuff comes in SMD packaging. I've got a decent soldering iron, so I really should be able to do it.
I bought a cheapo SMD practice kit off the internet (hurrah, China!), read a couple of tutorials, and this is the result:
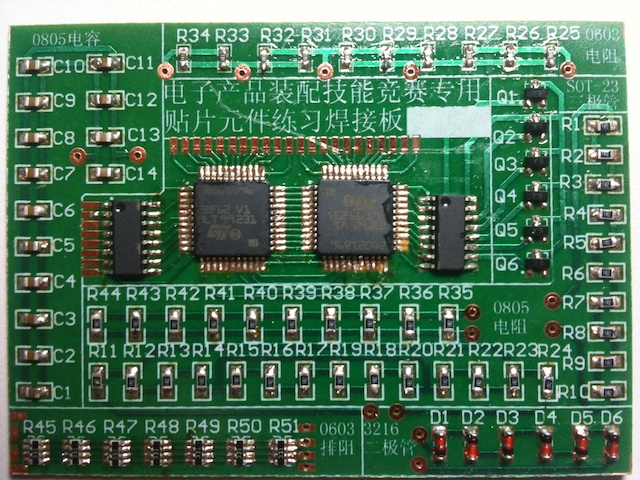
It may look not great, but actually pretty much all the pins, when inspected carefully, are soldered up without solder globbing together adjacent pins. I think the uneven lighting and highlights make it look worse than it is. In the end, everything was good (enough), except where I lifted some tracks on the first QFP that I tried:
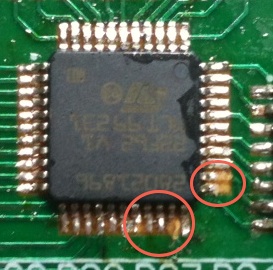
The main thing I learnt is that flux is magic. I got myself a flux pen, and it was a complete life-saver. The QFPs really want to be done with drag soldering (i.e. don't try to solder each pin individually, but just apply 'enough' solder and pull it along with the iron until all the pins are done). Unsurprisingly, unless you're an expert, you'll get 'jumpers' - adjacent pins soldered together. The great thing is that if you apply a shedload of flux and then wave your soldering iron over it, it'll generally just snap into the right configuration and remove your shorts. Whatever it's doing to surface tension or whatever, it's magic!
The other thing I learnt is that watchmaking tools are really helpful for this kind of stuff. Decent tweezers, lighting and loupes make the job much more pleasant than it would otherwise be.
I'm clearly still no expert. I've only got down as far as 0.8mm pitch on the QFPs. However, it was a very heartening experience, and I'm extremely tempted to use SMD devices in future projects!
Posted 2013-10-30.