Simon Frankau's blog
Ugh. I've always hated the word 'blog'. In any case, this is a chronologically ordered selection of my ramblings.
Electronics for Newbies: Reading a CP/M disk image and porting CP/M
Given a sector-read routine, creating a CP/M BIOS and porting CP/M should be straightforward. However, I needed a disk image for such an install to read. I could try constructing my own disk image from scratch, but I'd rather use an existing image to make sure I've got something realistic/authentic.
I took "appleiicpm.dsk" from simh, and poked around it. Everything seemed to be nicely sector-aligned, so the image didn't have extra inter-sector raw data or metadata, which would make my life easier.
How do I find the parameters of the disk? The parameters are generally wired into CP/M, rather than being written as a directly-accessible structure in the disk. Could I find the appropriate part of the CP/M boot image and extract the data structure?
The Disk Parameter Header is generally located next to a jump table at the start of the BIOS, so literally searching a hexdump of the disk image for 'c3 .. .. c3 .. ..' ('c3' being the hex code of the 'jp' instruction) found the jump table. The DPT table entry shows that there is no logical-to-physical sector mapping, which should make life a lot easier, and provides a pointer to the Disk Parameter Block, which is the real core set of parameters.
Unfortunately, that's an in-memory address. More fortunately, it's generally right next to the headers, and the offset within the disk image should align with the low-order bits of the in-memory image. Using this, I found the following sequence of data bytes:
spt   bsh blm exm dsm   drm   al0 al1 cks   ofs
20 00 03  07  00  7f 00 2f 00 c0  00  0c 00 03 00
From this, I can tell that there are 32 128-byte sectors per track, the block size is 1024 bytes, the disk size is 128KB, and there are 3 reserved tracks, among other parameters. All plain sailing from here, right?
No! Looking at the disk image, the directory entries and chunks of text are clearly not contiguous. Text in file might not be contiguous because of the way the directory structure works, but if you look at the directory entries, they're basically contiguous. Something's up.
By looking at the structure of human-readable text, we can see that the interleaving happens in 256-byte chunks. Perhaps this is why the built-in CP/M interleaving isn't used - the disk operations are blocked into 256 byte chunks, and the interleaving must happen at a layer below what CP/M deals with. Anyway, if I read the text on sectors, and see where the text continues between sectors, I can reverse-engineer the 256-byte-sector ordering on the disk:
0, 6, 12, 3, 9, 15, 14, 5, 11, 2,8, 7, 13, 4, 10, 1
Why they'd use a complicated scheme like this (rather than times n where n is relatively prime to the number of sectors) I have no idea, but there you go. With this in hand, I can uninterleave the disk image and, using online docs of CP/M disk structure, extract the contents.
Hurrah. Next step: Make the disk image accessible to my copy of CP/M on Dirac. Stealing someone else's idea, I made each 512 byte SD card sector map to a single 128 byte CP/M sector, and aligned the sectors for extra simplicity. I put my own CP/M in the boot sectors of the disk image, and tried to boot it.
It booted, but that was about as far as it went. DIR really didn't work. I tried adding more debugging code, but things got worse. The whole things was a bit Heisenbuggy - simple changes to the debugging code changed other behaviour that really shouldn't change. I eventually realised that CP/M expects very little to go on the stack, and my debug routines were scribbling on data below the stack. I fixed that. I fixed one or two other minor issues in the code. It's a little better, but still doesn't really work. *sigh*
In the end, the thing I'm relearning about these little computers is that debugging is a nightmare. You have to build the infrastructure from scratch, even with reasonable tools the test cycle is slow, and it's very easy to scribble on things you don't mean to. I'm not sure I'd make the best kernel developer. I'll keep trying to make it work, though!
Posted 2016-07-02.
Electronics for Newbies: Reading an SD card
Not really electronics at this stage, I'm writing the software to bit-bang data out of an SD card on Dirac. I have finally managed to extract a bit of boot sector off an SD card, a feat not entirely dissimilar to what I did with the floppy drive:
EB 00 90 20 20 20 20 20 20 20 20 00 02 20 01 00
02 00 02 00 00 F8 7B 00 3F 00 10 00 E9 00 00 00
17 43 0F 00 80 00 29 10 4A 73 18 4E 4F 20 4E 41
4D 45 20 20 20 20 46 41 54 31 36 20 20 20 00 00
There were a few little embarassing moments along the way. Like when I didn't seem to be getting any comms from the card, only to find it wasn't pushed properly into the adaptor. Or the bit where I could see the boot sector on the card from my laptop, but when I tried to read the first sector from Dirac I got zeros. Hmmm. I tried reading the second sector. I got 0xFFs. Weird. I think hard, I realise that on the Mac I'm reading the first sector of the partition. Checking the first couple of sectors of the disk, my reading has been correct. A few mistakes later, and I've finally got the data of the boot sector of that partition.
While this guide and this page have been useful, having simple, readable code to demonstrate how to do it has been really helpful.
Posted 2016-06-17.
Electronics for Newbies: SD card access
And again, another year since my last update on Dirac. Since then, I've done a few different projects, including building a VGA-generating circuit and reading data from a floppy drive.
On the Dirac front, I've mostly been doing software things, specifically learning about and fiddling with CP/M. It looks very much like a I should be able to port it to Dirac. However, I will need to have some kind of mass storage. So, I've added SD card access hardware to Dirac.
This is a lot less exciting than it sounds. I've finally wired up the parallel port chips control lines. Then I plugged a few pins through to the SD card breakout board, and off we go. It was made a bit more tricky by having to do 5V - 3.3V conversion, and basically running out of space on the breadboard, but now it's done!
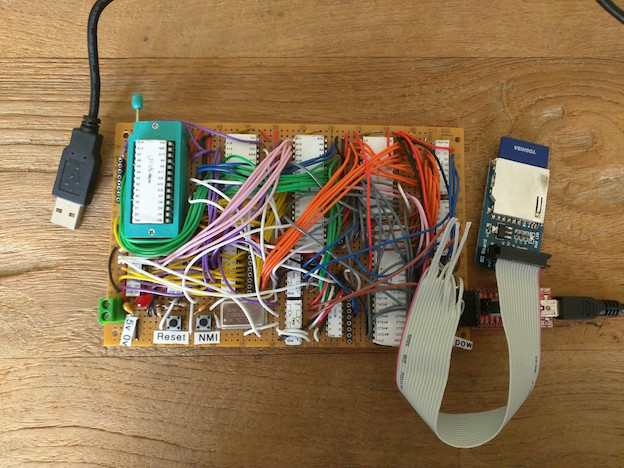
There are updates to the schematics, docs and code on github. So far, I've really focused on getting the hardware together, with minimal software to test it. From here on out, this should be pretty much a software project.
Resource-wise, there are a couple of good pages about how to do SD card interfacing, which are dead useful. Interfacing in SPI mode looks extremely plausible.
The remaining physical-side effort is not electronics, it's getting a case. So far, I've survived with a bare board, but I really need to prevent it from getting damaged now that it seems to be working. I suspect a custom laser-cut plywood box would be appropriate.
Posted 2016-06-05.
Reconstructing floppy drive data
So, previously I managed to extract some data from a floppy disk using a floppy drive and an oscilloscope. Could I make head or tail of it? Turns out I could. I saved the waveform as a CSV and got to work on it. My initial pass looked promising, but only covered a fraction of a single sector. I tweaked the software, recorded another waveform (with a lower frequency of samples, allowing me to record more sectors), and it looks like it's doing the job!
I guess the first thing is "How do you find out about the raw encoding for a floppy disk?". While the Internet Knows Everything, it's actually relatively thin on the ground as far as this kind of documentation for out-moded technology goes. I used a combination of this book and this page. I would just like to say, MFM is a really neat idea.
The code and the waveforms are up on github. It really does appear to work! If I hexdump the first sector, I get this:
00000000  eb 3c 90 29 37 66 32 64  49 48 43 00 02 01 01 00  |.<.)7f2dIHC.....|
00000010  02 e0 00 40 0b f0 09 00  12 00 02 00 00 00 00 00  |...@............|
00000020  00 00 00 00 00 00 29 21  9f 7a 26 20 20 20 20 20  |......)!.z&     |
00000030  20 20 20 20 20 20 46 41  54 31 32 20 20 20 fa 33  |      FAT12   .3|
00000040  c9 8e d1 bc fc 7b 16 07  bd 78 00 c5 76 00 1e 56  |.....{...x..v..V|
00000050  16 55 bf 22 05 89 7e 00  89 4e 02 b1 0b fc f3 a4  |.U."..~..N......|
00000060  06 1f bd 00 7c c6 45 fe  0f 8b 46 18 88 45 f9 38  |....|.E...F..E.8|
00000070  4e 24 7d 22 8b c1 99 e8  77 01 72 1a 83 eb 3a 66  |N$}"....w.r...:f|
00000080  a1 1c 7c 66 3b 07 8a 57  fc 75 06 80 ca 02 88 56  |..|f;..W.u.....V|
00000090  02 80 c3 10 73 ed 33 c9  8a 46 10 98 f7 66 16 03  |....s.3..F...f..|
000000a0  46 1c 13 56 1e 03 46 0e  13 d1 8b 76 11 60 89 46  |F..V..F....v.`.F|
000000b0  fc 89 56 fe b8 20 00 f7  e6 8b 5e 0b 03 c3 48 f7  |..V.. ....^...H.|
000000c0  f3 01 46 fc 11 4e fe 61  bf 00 07 e8 23 01 72 39  |..F..N.a....#.r9|
000000d0  38 2d 74 17 60 b1 0b be  d8 7d f3 a6 61 74 39 4e  |8-t.`....}..at9N|
000000e0  74 09 83 c7 20 3b fb 72  e7 eb dd be 7f 7d ac 98  |t... ;.r.....}..|
000000f0  03 f0 ac 84 c0 74 17 3c  ff 74 09 b4 0e bb 07 00  |.....t.<.t......|
00000100  cd 10 eb ee be 82 7d eb  e5 be 80 7d eb e0 98 cd  |......}....}....|
00000110  16 5e 1f 66 8f 04 cd 19  be 81 7d 8b 7d 1a 8d 45  |.^.f......}.}..E|
00000120  fe 8a 4e 0d f7 e1 03 46  fc 13 56 fe b1 04 e8 c1  |..N....F..V.....|
00000130  00 72 d6 ea 00 02 70 00  b4 42 eb 2d 60 66 6a 00  |.r....p..B.-`fj.|
00000140  52 50 06 53 6a 01 6a 10  8b f4 74 ec 91 92 33 d2  |RP.Sj.j...t...3.|
00000150  f7 76 18 91 f7 76 18 42  87 ca f7 76 1a 8a f2 8a  |.v...v.B...v....|
00000160  e8 c0 cc 02 0a cc b8 01  02 8a 56 24 cd 13 8d 64  |..........V$...d|
00000170  10 61 72 0a 40 75 01 42  03 5e 0b 49 75 77 c3 03  |.ar.@u.B.^.Iuw..|
00000180  18 01 27 0d 0a 49 6e 76  61 6c 69 64 20 73 79 73  |..'..Invalid sys|
00000190  74 65 6d 20 64 69 73 6b  ff 0d 0a 44 69 73 6b 20  |tem disk...Disk |
000001a0  49 2f 4f 20 65 72 72 6f  72 ff 0d 0a 52 65 70 6c  |I/O error...Repl|
000001b0  61 63 65 20 74 68 65 20  64 69 73 6b 2c 20 61 6e  |ace the disk, an|
000001c0  64 20 74 68 65 6e 20 70  72 65 73 73 20 61 6e 79  |d then press any|
000001d0  20 6b 65 79 0d 0a 00 00  49 4f 20 20 20 20 20 20  | key....IO      |
000001e0  53 59 53 4d 53 44 4f 53  20 20 20 53 59 53 7f 01  |SYSMSDOS   SYS..|
000001f0  00 41 bb 00 07 80 7e 02  0e e9 40 ff 00 00 55 aa  |.A....~...@...U.|
00000200
It's got the assembly jump at the start over the OEM ID and BIOS Parameter Block, the 0x55 0xAA at the end of the sector, and a bunch of assembly in the middle and various strings. Bingo!
Posted 2016-04-27.
Reading from a floppy drive with an oscilloscope
I feel I've more-or-less conquered VGA, so perhaps it was time to conquer another mysterious technology of my youth: floppy disks. At the time, low-level details always seemed rather rare, and even now useful details are thin on the ground - while the Internet gives us a tonne more information on most stuff, floppy disk drives are sufficiently irrelevant that it's a bit thin on the ground for FDDs.
Step #0: Power. How do I power the drive before I start playing with it? The standard FDD connector takes in 5V and 12V, but fortunately my 3.5" drive (yes, I have a 5.25" drive, but I thought I'd play with 3.5" first) has N/C on the PCB for the 12V line, so I only provided 5V, and it worked!
Next step - control lines. The obvious starting point is the pin-out. It's pleasantly straightforward. I assumed the levels were TTL. Reading the level on the inputs suggests passive pull-up with active pull-down required to trigger functions. Pulling down the drive B motor line (which becomes drive A after passing through the twist in the floppy cable) makes the motor run (but only if there's a disk in the drive). Pulling the drive B select line low makes the light on the front light up (ditto only if there's a disk in the drive).
The lines from the drive are only driven if the select line is low. This too is actively pulled low, expecting passive pull-up, which makes sense for a kind of wired-or active-low bus. At this point, I can use the step and direction line to manually step to track zero - it appears that if you don't pull the direction line low it steps to lower track numbers, so stepping to track zero is pretty straightforward.
At this point, my set-up looks something like this:
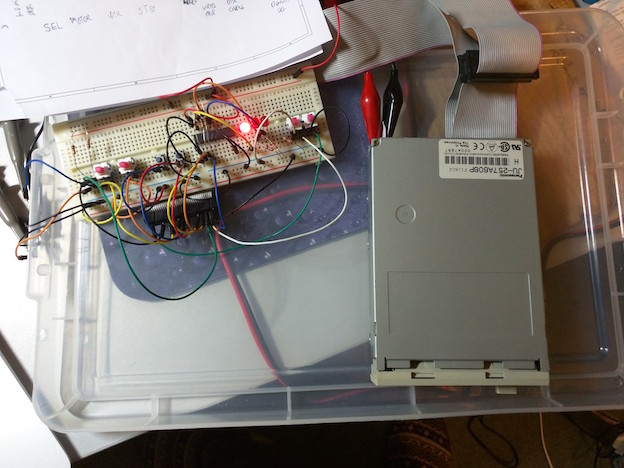
And now, reading the disk. When the motor's running (and drive select line low), the the index line pulses at 5Hz, so the drive's running at 300 RPM. If I attach an oscilloscope to the data line, triggering on the index line, you can see the data pulses:
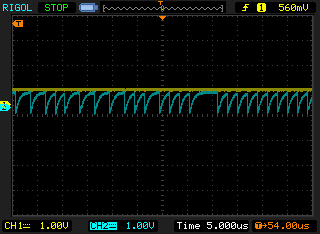
You can see the ticks down when the pulses happen, and I assume the curve up is some kind of RC curve from the pull-up resistor I added. Next stop: saving the signal and extracting the data.
Posted 2016-04-19.
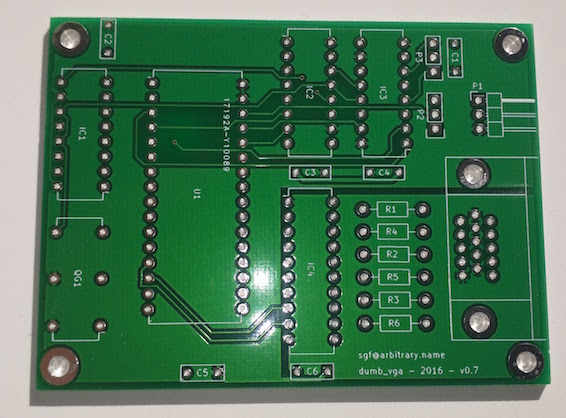
Generating VGA with a proper PCB
I've been quiet on this project for a while, but I actually made progress some time ago. I drew up a PCB layout (available on Github), and sent it off to Smart Prototyping. Lo and behold, some actual, usable boards came back...

Children's thumbs for scale, obviously! My stack of PCBs was sealed up nicely inside:

So, let's get one out and look at it! Yes, this is a bit excessive on the photos, but this is the first PCB I've designed...
I populated the board:

Then I powered it up, and it worked like a charm, first time!
Now to work out how to get rid of the other nine boards....
Posted 2016-04-16.
Alphago as BS detector
One of the great things about Alphago winning three matches and then losing a fourth is it manages to undermine the most spectacular BS generators who were talking about Alphago's superhuman abilities after match three.
I am a great fan of what Alphago's done. Being a person who, at one point could probably have beaten any go-playing program on the planet, the advancement seen is amazing, especially to reach up to professional levels. Alphago is awesome and I have a huge amount of respect for the developers.
And then you get people like Eliezer Yudkowsky of the "Machine Intelligence Research Institute". I've been somewhat tired of the whole hyper-rational mysticism thing where they carefully draw logical conclusions from extremely shaky premises. It rather reminds me of the Pythagorean cults. The ancient Greeks were pretty good at maths, but sucked at science.
Anyway, back to this particular screed. Much of it is about how Alphago is a strongly super-human player of such strength that pros don't understand its moves. Which looks a bit silly when Alphago loses its fourth match. (An update says it's just perhaps a flawed strongly super-human player. Of course.)
This seems like rubbish to me because even at a few stones difference in strength, I can still understand the moves being played by a stronger player - I just can't play them myself, just in the same way that I can understand a clever proof that I'd not be able to devise myself.
The main thing that strikes me about this ill-advised post, is that it's providing a vast amount of strong opinion, with the minor problems that Yudkowsky a) doesn't know much about go b) doesn't know much about how Alphago works. A lesser person would perhaps let this stop them from writing.
Instead this event is a Rorschach test that allows one to demonstrate AI theory hobby-horses without letting reality get too close.
One quote I particularly enjoyed was this:
Human-equivalent competence is a small and undistinguished region in possibility-space. [...] AI is either overwhelmingly stupider or overwhelmingly smarter than you. The more other AI progress and the greater the hardware overhang, the less time you spend in the narrow space between these regions. There was a time when AIs were roughly as good as the best human Go-players, and it was a week in late January.
This really is pretty naff. If you run the numbers and work out human-competence as information-theoretic bits-worth of mistakes per game, human competence covers a good and interesting region of the possibility space. There's a good area above us, but the very top is inaccessible even to super-intelligent beings - it's effectively limited to exhaustive search, which is just computationally infeasible.
A bit below the impossible, there is a space for super-human go players. However, there's no real indication of magic here. The space looks pretty smooth - the choice between a good move and a great move is smaller than the choice between some good move and some bad move. This means that a) optimisation is harder, making the building of a super-human AI difficult b) super-human AI moves won't look utterly alien - just good in a way that is difficult to judge compared to alternatives.
Fundamentally, go is a really bad task with which to wave the flag for incomprehensible AI. Tasks like "write a program/design a system to do XYZ" is are fantastic, since artificial systems can explore unlikely spaces we'd never investigate - look at some of the neat things done with genetic algorithms. Go is an awful screw for Yudkowsky's AI angst hammer.
Posted 2016-03-13.
We are neural nets
Back in the late '90s, Penrose's Emperor's New Mind approach to how we work rather appealed to me. That had brains working as a kind of quantum machine, putting a certain amount of specialness in the way they work, and rather nicely tying free will to quantum randomness.
Since then, the last decade of artificial intelligence work has frankly astonished me. Neural net programs have been around since at least the '50s and, well, around 2000 they were more than a little unimpressive. Progress was rubbish, artificial intelligence consisted of everything we didn't know how to do, and so couldn't make computers do.
After that, advances in deep learning (TM) have done some fantastic things. We have image recognition, with textual description generation and go-playing programs able to beat top professionals, to name just two applications of neural nets that would have been mind-boggling just a few years ago. They are also applications in which the systems can demonstrate some very human-like behaviour.
If you look at the Deep Dream images, you can see some more human-like traits - it's spotting patterns that aren't really there, and emphasising it, producing psychodelic images - i.e. images reminiscent of how a misfunctioning vision system works, but also, well... rather imaginative.
For a while I thought that, even if quantum effects weren't key to how our brains work, there might be some "secret sauce" in the biomechanical systems, that the implementation of our brains had some extra subtlety. Looking at what we can achieve by building relatively simple neural network models, it seems that the actual detailed hardware of how our brains work is just an implementation detail, of as much relevance to the overall algorithms our brain runs as the CMOS process used is relevant to a processor's ISA.
A lot of of our high-level models of the brain are fitted neatly by just saying "we're a big neural net". "Priming" and related behaviour can be viewed as just activating the subnetworks associated with that concept. The idea of thinking as dealing with a network of semantically-related symbols (e.g. Goedel, Escher, Bach) is somewhat more literally true, albeit by throwing lots of nodes at the problem, rather than trying to have an explicit node for each concept.
Sleep looks suspiciously like running our brains in "training mode". "Deep Dream" is perhaps a particularly good title, in that it shows the effects of reinforcing the patterns being spotted. We are, at a very fundamental level, pattern recognition machines, and this explains why we like picking up new patterns so much - why we like to learn new things.
If we really are so closely related to the artificial intelligences we are building today, it starts to make the terminology itself suspect. If we keep going, the intelligence we produce won't be fake in any way, as "artificial" may imply (although it will still keep the meaning of deliberately constructed). Perhaps "machine intelligence" is better.
On the other hand, if we are, effectively, the implementation of a learning algorithm, the way we think may have some universal roots. If we ever do make contact with aliens, we may find them more like ourselves than we expected.
Posted 2016-03-13.
More VGA generation
My code and schematics are now up on Github. Hurrah.
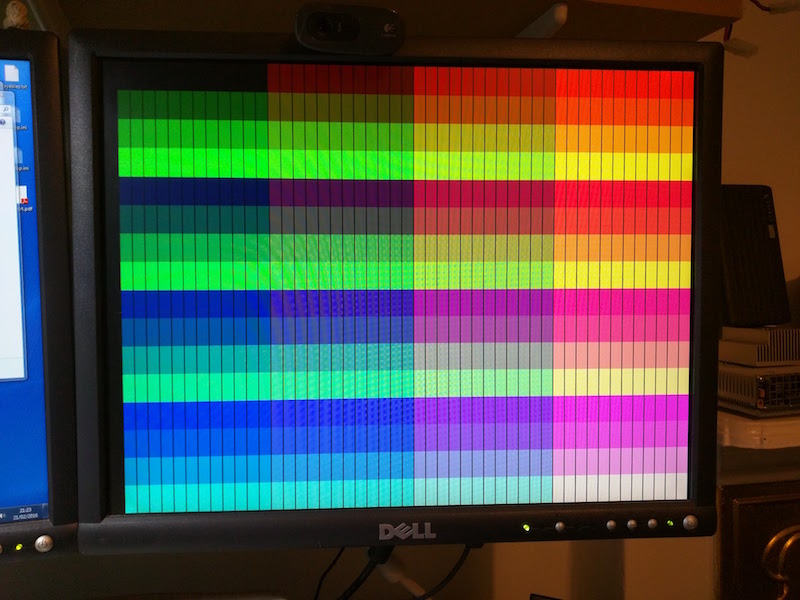
While I was previously terribly excited by my flashing animation, I hadn't really noticed that the test stripes I'd put in the image were uneven, although this is pretty clearly visible:
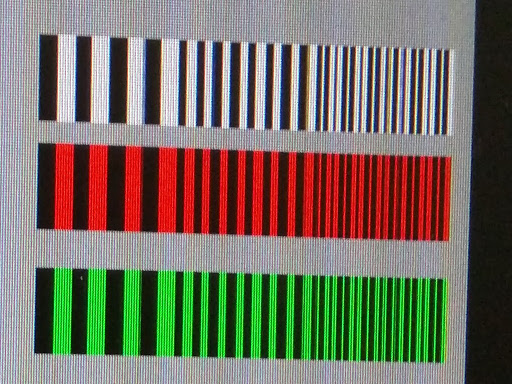
Was this an artefact of the generating hardware's timing, or just the way that the monitor samples the data? 768x480 is not exactly a standard resolution, so it may be somewhat confused. If I go through the monitor's menu, it does indeed appear to be confused:
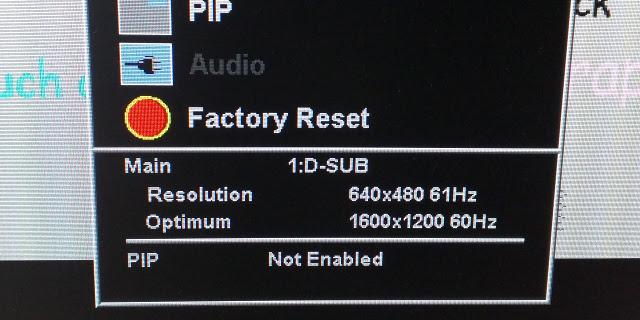
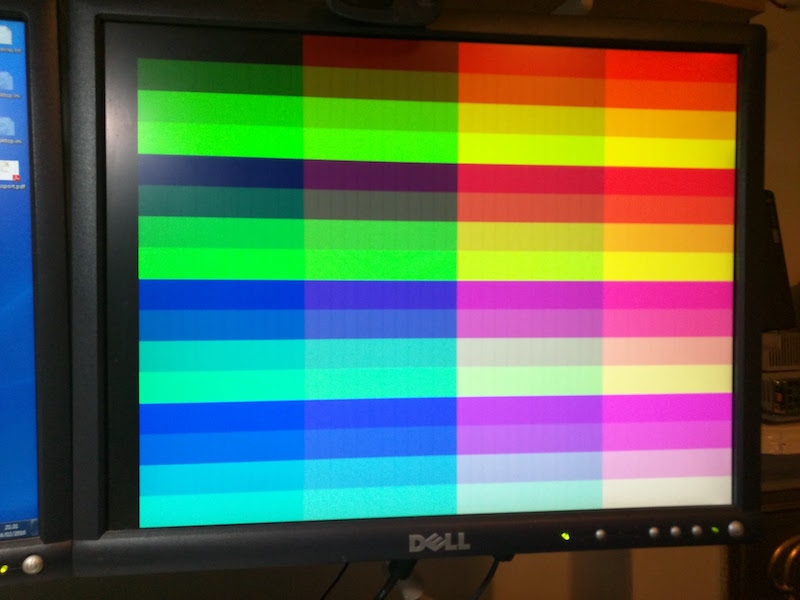
So, I tried to deconfuse it a bit. I reduced the horizontal resolution to 640 pixels, although this made the horizontal timing a bit strange, and I'm not sure the monitor believed me. However, between that and hitting the appropriate monitor menu items to get it to resync, I got the following output:

And here we can clearly see the pixels that the image maps to, and it appears there's a fairly consistent 2-to-3 source pixels to screen pixels mapping. It looks very much like the monitor trying to work out how to scale the image.
I may try a few more experiments to see how the monitor goes about its mapping, and try to work out why it decided to discretize rather than interpolate. It's kind of a shame I don't have a chunky old dumb analogue monitor any more to play around with.
Posted 2016-03-09.
High(er)-resolution animation
Carrying on from my previous exploits in generating video signals, I decided to try to up the clock frequency and maybe even get a bit of animation going. I used a 16MHz crystal, as the memory is something like 50ns or 60ns, and so 32MHz looked a bad idea. This gives me a 384x480 resolution, with effectively double-width pixels. One you put in all the H- and V-sync areas, that's 256KB, so I can fit two frames in the 512KB flash. By connecting the top-bit of my 24-bit counter to the top bit of the memory address line, I get two frames per seconds.
At least, that's the theory. I change the crystal, program the memory, and the signals look fine on the 'scope, but nothing displays on the monitor. The 16MHz oscillator I have doesn't exactly produce a crisp square wave, so I tried feeding the oscillator output through an inverter to square it up before using it to latch the signals feeding the display. Lo and behold, it works!
Video of it animating. So tasteful.
I'm still not entirely sure why the inverter helped. Sticking another inverter in the path still works, so it's not about inverting the phase, so perhaps it just needed a squarer wave for the latch, but maybe sticking a bit of propagation delays in helps. I'm going to play about with it a bit more, see what works.
Github repo still pending!
Posted 2016-03-05.
Another switch-mode power supply goes bang
Turning on the hairdryer today, I heard a bang, and the circuit breaker tripped. Switching it back on, everything seemed ok, but I eventually discovered my mains-based network wasn't working. My Billion Homeplug had given up the magic smoke. Here's what I saw inside:
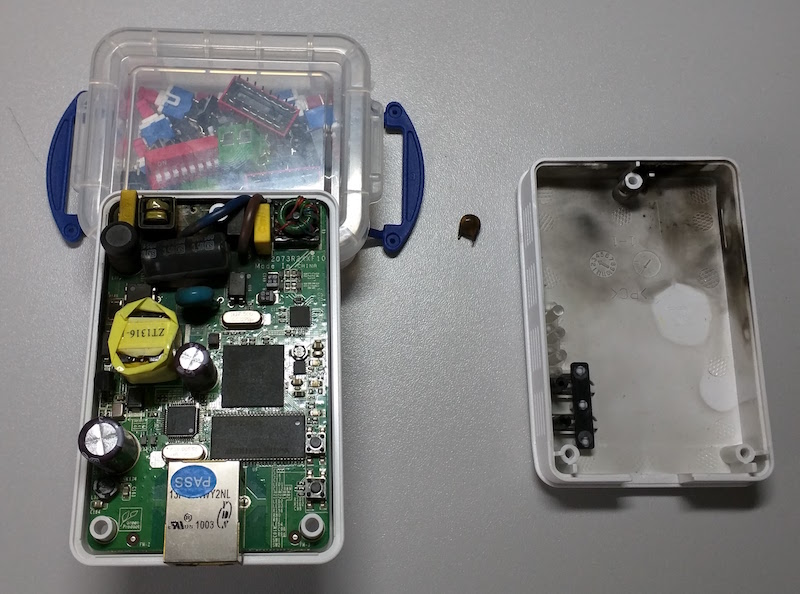
The capacitor (or capacitor look-alike) had gone pop, and indeed you could hear a rattling noise before I opened the case up. As with my other switch-mode PSU explosion, I still find it weird to open up a mains-connected piece of electronics and not see a giant chunky transformer. They're fantastic, but I'm not sure about the reliability of these switch-mode wonders.
Posted 2016-03-05.
Dumb generation of VGA video
Before I start, I should emphasise that I'm generating VGA voltage levels, to a VGA signal pattern, over a VGA connector, but not using a standard VGA resolution or pixel clock. Fortunately, I've had a monitor capable of multisync since 1995, so I don't see this as being much of a problem.
Following up from my post on VGA signals, I decided to try to make the very dumbest "VGA" generator possible. The idea is to hook up a counter to an EEPROM/Flash memory, and then hook the data pins up to the VGA connector. The sync and video signals would all just be directly recorded in the data.
The basic circuit was straightforward, and whipped up on a breadboard. I used a 2MHz oscillator, as that's what I had around, and it was a nice, low frequency to send signals around a breadboard with. The downside is that each on-screen "pixel" would be rather wide, but I'd live with it. This fed into 3 daisy-chained 74HC590s. I discovered that while chaining the RCO (ripple carry out) into CE (count enable) worked for connecting the first and second stage, it didn't work between the second and third stage (go work out why :). Instead I reconfigured it, as suggested in the data sheet, to feed the RCO of the second stage into the CPC (counter clock input) of the next stage. I now had a 24-bit counter to address whatever memory I put in. It appears ripple delay wasn't a problem.
For memory, I selected a 29040 512KB Flash memory. I'm sure there's a tiny processor in there, so my VGA display is not technically CPU-free, but, well, we could pretend it's just a ROM. I'd been using EEPROMs in the past, but I'd noticed that Flash memories are bigger and cheaper, so, well, that's what I used.
I cobbled up a video mode whose total pixels-per-frame neatly fits into the memory (actually, fitting neatly into 32KB, but I repeated it throughout the memory's address space - I guess I could have created an animation), and wrote a little Lua script to generate a memory image to generate the signal.
The 8 data bits of the memory then drive the lines of the VGA connector. H- and V-sync are driven directly by the TTL-compatible output of the memory. The remaining 6 pins give us 2 bits of red, green and blue. 64 colours is way more than I ever had on my ZX Spectrum. To get these colours I put in a resistor in series with each of the pins producing colour, so that when both pins are on, with a voltage divider with the 75 Ohms at the monitor end of the cable, the TTL signals become a 0.7V VGA-like signal.
And... the end result works! Here it is, with just 3 bits of colour (I was a little impatient!):
I wired up the other 3 bits, and, well, got the colours:
You can see the invidual horizontal pixels which, as predicted were rather wide (16 times as wide as if we'd run off a VGA-like pixel clock). However - there's a big vertical stripe down at the end of each pixel. What's that about? When I dig the oscilloscope out, I see big piles of transients between the pixels where the memory output is changing. If I put an octal latch on the output of the memory, clocked on the oscillator to make the signal cleaner, the stripe goes away:
I'm a Bad Person as the latch I have triggers on the same edge as the address changes on, so I'm probably breaking set-up and hold times, but the chip doesn't mind - if I pop an inverter on the clock signal, it makes no difference to the video image.
I have quite a few plans from here. I'd like to try to up the frequency of the oscillator, to get higher resolution, and I'd like to use the high bits of the oscillator to trigger the high bits of the memory, to generate animation. Oh, and I plan to get the code and schematic documented, and get the thing up on github. Fun, fun, fun!
Posted 2016-02-28.
Spectrum composite mod
I am perhaps the last person to composite mod their Spectrum. I dug it out to demonstrate 80s computing to the children (much fun was had by all), and while our TV does take [UV]HF in, it's probably going to be the last one that does. So, I gritted my teeth, committed sacrilege on the machine I grew up with, and did the mod.
Of course, I did the reversible version, unsoldering leads rather than cutting them. Even then, I was extremely twitchy about lifting a pad or whatever. Interestingly, though, no hardware change would have been necessary. As an experiment, I just tapped into the composite signal being fed into the modulator (with an alligator clip!), and... it works fine on the display. The modulator doesn't do anything sufficiently bad to make my display fail. The business of disconnecting the existing modulator and routing the signal out through the TV out socket seems to be largely for convenience. And for me... convenience won in the end.
Of course, resurrecting the Spectrum didn't involve just twiddling the video output. After a couple of decades (at least) since last use, I had to replace the grotty old keyboard membrane. It turns out my muscle memory for the Spectrum keywords hasn't gone away, which is midldy scary. I also bought a SMART card to load memory images into the Spectrum, which is both cheap and effective. It's all pretty cool, although admittedly not as convenient as an emulator.
Posted 2016-02-21.
Knitting some swatches
Having knitted a couple of scarves with plain patterns (garter stitch and stockinette), I thought I'd try out some other patterns, and see what there is to that. I've now knitted up a few swatches for the simplest patterns, as I work my way up. I'm trying to match the lengths on them, so that by the time I'm done I can stitch them together and create... yet another scarf!
In any case, here are the swatches I've created so far:
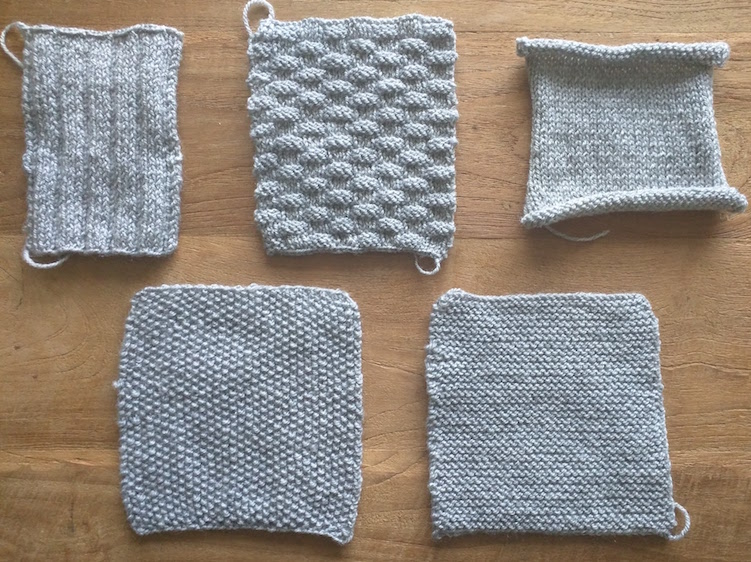
These are, clockwise, starting from the top left, 2x4 ribbing, basket weave, stockinette, garter stitch and seed stitch. So, there you go. Now I'm trying to work on some slightly more fancy patterns....
Posted 2016-02-21.
VGA(ish) signal timing
In 1995, I had a relatively brutal introduction to VGA signal timings. I wanted to set up XFree86, for which you had to specify the exact signal timings, and the documents were impressively confusing to a teenager, yet also full of dire warnings that GETTING THIS WRONG COULD DESTROY YOUR MONITOR. Somehow I got through it all and managed to get a working X11 set-up, largely by cargo-culting the examples. Kids these days (and myself) have it easy, etc.
Fast forward a decade, and I saw Eben Upton bit-banging a VGA signal using an AVR. This was his idea of Raspberry Pi at the time - a small, simple and understandable computer to teach kids to program. Like an early micro, the AVR could bit bang the screen as it was being rasterised, and do its computation in the vertical fly-back, and you could run an interpreted language on top of that. Of course, the final RPi was something incredibly different, and stunningly more powerful, but it was awesome to see it evolve from that.
Roll forward another decade (argh!). I've been interested in generating my own VGA signal for years - not in software, but as another hardware project, building my own graphics card. It's way down my projects list, but this evening I thought I'd make a little step on the road there - I wanted to both refresh my memory and make sure I fully understood how a VGA signal works. For the moment, I'm ignoring the analogue details - I want to get a handle on the timings.
There are a number of websites describing VGA signals, but I never really trust those timing diagrams, especially with all the elided data. So, I whipped out my oscilloscope, wired up a VGA connector, plugged it into my monitor cable, and got the actual waveform.
My plan is to describe the waveform algebraically. There are three sets of lines of interest - the RGB colour lines, horizontal sync and vertical sync. I'll create a few states based on what's being placed on those lines at a particular point in time:
- DATA RGB lines contain data, H and V sync low
- BLANK RGB lines low, H and V sync low
- HSYNC RGB lines low, H sync high and V sync low
- VSYNC RGB lines low, H sync low and V sync high
- HVSYNC RGB lines low, H sync high and V sync high
All of the above represent the lines being held for one pixel clock time unit. From this, we can construct some signals. I'll use '* n' to represent a signal pattern being repeated n times, and '+' to mean signal concatenation.
- DATA_LINE ::= HSYNC * hs + BLANK * hbp + DATA * hres + BLANK * hfp
- BLANK_LINE ::= HSYNC * hs + BLANK * (hbp + data + hfp)
- VSYNC_LINE ::= HVSYNC * hs + VSYNC * (hbp + data + hfp)
- FRAME ::= VSYNC_LINE * vs + BLANK_LINE * vbp + DATA_LINE * vres + BLANK_LINE * vfp
One thing to note, which seems to get left out of some timing diagrams, is that the H syncs keep going through the vertical blanking period - it's just that there's no image data during that period. The vertical sync signal edges are sync'd to the rising edge of the horizontal sync signal.
The variables are as follows, including example values for 800*600 at 75Hz:
- hs Length of horizontal sync. 80 pixels.
- hbp Horizontal 'back porch'. 160 pixels.
- hfp Horizontal 'front porch'. 16 pixels.
- hres Visible horizontal resolution. 800 pixels.
- vs Length of vertical sync. 3 lines.
- vbp Vertical 'back porch'. 20 lines.
- vfp Vertical 'front porch'. 1 line.
- vres Visible vertical resolution. 600 line.
From this we can see there are 1056 pixel clocks per line, and 624 lines per frame, and at around 75 frames per second, this is 1056 * 624 * 75 = 49420800 pixels per second. I believe at 49.5 MHz clock is used.
Posted 2016-01-26.
Special relativity, part 3
I've finished reading Spacetime Physics, and have just a few more notes from the last section of the book...
Momenergy is an awesome concept! The combined momentum-energy 4-vector is very neat. The way that Newtonian energy is just a Taylor expansion term of the full relativistic time component of momenergy is surprising and wonderful. Mass (described elsewhere as rest mass) as an invariant quantity, like subjective/proper time is super-neat. Photons lack mass but still have energy and momentum, as the Lorentzian metric length is zero but the components are not - we have an answer to the question "what happens to the momentum of a particle, when you take the mass to zero and the speed to c?".
Basic particle physics interactions then become... almost obvious. The total sum of the 4 vectors in the system are preserved, and it all flows from there.
One of the nuttiest things is that mass, being the length of a 4 vector, doesn't sum (using the Taylor and Wheeler approach of mass as 'rest mass', not 'relativistic mass'). Unsurprisingly, Taylor and Wheeler avoid trying to build concepts like forces and centre of mass on top of this.
A thing that confused me for a while is that a change of reference frame produces Doppler shift on photons, changing their energy. But... their mass and speed stay the same across all reference frames. What's going on? So, the mass stays the same (0), and speed stays the same (c). With a change of reference frame, both energy and momentum change by the same amount, so that mass remains the same, and it's all fine.
So, I've done special relativity. The last chapter of the book concerns general relativity, and it really leaves me with more questions than answers. Why gravity in particular is a special force, and exactly how curving spacetime is fundamentally different from a field-based approach are not clear to me. On to the general relativity texts, I guess.
Posted 2016-01-17.
Special relativity, part 2
Warning: I'm so depressingly out of practice at mathematical things that I could well have stupid mistakes in the following. Sorry! If you spot anything wrong, please mail and correct me...
Some more notes on special relativity as I traverse Taylor and Wheeler's Spacetime physics.
Subjective travel times
So, I like hyperbolic rotation stuff, because it makes addition of change of velocity behave in a nice additive fashion. We have the relativistic velocity as tanh(zeta), where zeta is the rapidity. I like rapidity because it's additive and at low speeds is the same as velocity. From the point of view of a person accelerating to a relativistic speed, they can treat the acceleration as a large number of small changes of velocity, and the rapidity is the velocity they would expect to have in a Newtonian universe.
In a Newtonian universe, travelling distance d would take time d / zeta. Subjectively, in a relativistic universe, things would move past you at velocity v = tanh(zeta). On the other hand, Lorentz contraction would make the distance d' = d / cosh(zeta). Subjectively it would take time d' / v = d / (cosh(zeta) * tanh(zeta)) = d / sinh(zeta) < d / zeta.
In other words, if you're going somewhere far away, subjectively it takes less time than in a Newtonian universe!
Interpretation of interval
The interval, t^2 - x^2, is a nice invariant, but what's its physical interpretation? The "straight line path" is the route that maximises the interval, and (for time-like paths) you can find a frame in which the x movement is 0 zero, in which case the interval is just the square of the most time you can experience going between the points in space-time. Which is also known as proper time.
About this point, I realise this is all covered about 4 pages ahead of where I got to in Spacetime Physics.
Change of velocity as shear
In Newtonian mechanics, a change of space or time reference point is a translation, and a change of velocity is a shear. In special relativity in its normal representation, a change of reference point is a translation, but change of velocity is nothing like a shear. Can we find a way of reformulating things so that it is a shear, at the cost of making a change of reference point into something quite different?
Yes we can! First of all, we make the y-axis into sqrt(t^2 - x^2). As each line of constant y now represents a particular interval, the y-axis value is unmodified by a change of velocity, as required for a shear. By using a square root, the y-axis is still a time axis for x = 0.
Then we want the x-axis to behave like a shear during change of velocity, with it being affected by a translation, proportional to the distance up the y-axis. A thing that behaves additively under change of velocity is rapidity, and moreover each point along the x-axis for a fixed value of the y-axis (interval) represents a specific rapidity required to reach that point in spacetime. So, if we change the x-axis to sinh^-1(x), we get the behaviour we want!
Admittedly the resulting representation of spacetime doesn't behave nicely under translation or have other properties we'd like, but still!
Uniform acceleration doesn't lead to uniform time
One of the things I found fairly unexpected is that, given two identically accelerated objects, positioned at different points in the direction of acceleration, they will age differently. This carries through to general relativity, so that objects in a uniform gravitational field age differently. In other words, you can tell that you're undergoing uniform acceleration, and it's not equivalent to genuine free-float, which I find utterly unexpected.
Time in the rest frame as action points
As I have little intuition about the Lorentz metric, I've been playing around in order to get a feel for it. This motivated the "relativistic change of velocity as shear" thing above. It's very tempting to try to reframe the Lorentzian metric as a normal Euclidean one. So, one way to look at it is to track the motion of a set of particles in a particular reference frame. Each particle, in this reference frame, can move some distance x and accumulate some proper time sqrt(t^2 - x^2), for a given amount of time in the reference frame, t.
In other words, a particle, measured against a reference frame, can "choose" to spend that reference frame time on moving or experiencing the passage of time. In the parlance of turn-based strategy games, time in the reference frame is actions points that can be spent on movement (in the reference frame) or action (subjective experience of the passage of time), albeit with a Euclidean l2 norm, rather than the l1 norm of those games (sum up movements plus actions).
Put another way, reference frame time is path length of a path representing travel through a Euclidean metric spacetime of reference frame space and subjective time. This does not look particularly helpful, since you are unlikely to want to match subjective times together, but I thought it a nicely different way to look at things.
Posted 2015-12-20.
Special relativity, part 1
Warning: I'm so depressingly out of practice at mathematical things that I could well have stupid mistakes in the following. Sorry! If you spot anything wrong, please mail and correct me...
So, I'm slowly working through Taylor and Wheeler's Spacetime Physics, which is a reasonable pile of fun. I reached the halfway point during my gardening leave, and have basically been on hold while I've been learning the new job. However, I thought it worth starting to write up some notes on the things I've been thinking about while learning special relativity.
- Invariance of interval is a great starting point for the book. I'd previously read explanations based on Lorentz transformation, and this is a much more intuitive explanation.
- Change of reference frame The fundamental point is that a change of reference frame that changes velocity is no longer a shear, but a hyperbolic rotation. Talk of hyperbolic functions was in the first edition of the book (which I "trialed" before I bought the paper copy), but sadly taken out of the second edition.
- Lorentz contraction is weird If we go past each other at speed, you seem shorter, with time going slower to me, and you see me as shorter with time going slower? Yep. This is not entirely alien - you get the same thing in a non-relativistic world where, if we run past each other while making a noise, we both hear the same Doppler effect coming from the other person. It does seem a bit odd, doesn't it, though?
- The garage paradox I finally understand the question about "Imagine you drive a long car really fast into a short garage. The car fits from the reference frame of the garage, why can't you park it?" If you want to stop the front and rear of the car at the same point in time from the reference frame of the garage, you'll be stopping them at different times in the reference from of the car - namely stopping the front rather earlier than stopping the back!
- How come we get contraction if the Lorentz transform increases coordinates? The Lorentz transformation has x' = (x + vt) / (1-v^2)^0.5. The term on the bottom is less than 1, so we're stretching out x coordinates. But we're supposed to have a contraction. What's going on? While the transform changes x coordinates, it also changes t coordinates. The transformed points that have the same t' coordinates have x' coordinates that are closer together. I should draw a diagram.
I've got some more complicated bits to cover (even before I get onto the second half of the book), but that'll do for now.
Posted 2015-12-19.
Another knitting project
It's been 3 years since my last knitting project, and I recently bought a book on knitting, so it seemed time to create a new project. Plus we had this weird multi-coloured wool lying about the place.
Last time, I knitted and only knitted. I never learnt to purl. This meant I ended up producing garter stitch, which is frankly not as pretty as the stockinette everyone's used to. This time, I learnt to purl!
(The book recommends using plain wool when learning, but this multi-coloured stuff's pretty good, since the colour changes make it all a bit clearer as to what's going on.)
Actually, I tried to do a bunch of fancy stitches, and tended to end up with accidental yarn-overs when switching between knit and purl within a row, so I just fell back on doing a bunch of stockinette. Caroline then suggested making mini circular scarfs for the kids (or "snoods", although I can't face the term), so that's what I did.
Once I got the hang of stockinette I put in a bit of switching over the stitches in order to create initials on the scarves to distinguish them. The first one I just tried creating a region of inverted stockinette, but that didn't work so well - the way it tends to curl in opposite directions at the sides and ends meant that some bits bumped up, and some down. For the second one, I tried doing the initialed area in garter stitch. It more or less worked. Hey ho.
End of step one, it looks liked this:
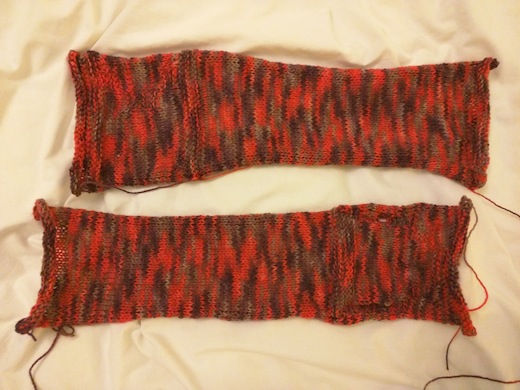
You can see they look a little, err, uneven. Rather like my first scarf. Apparently the secret is "blocking", which is a fancy term for pinning it out and getting it wet and making it dry in the right shape. Doing this properly involves threading stuff around the edge to to get a nice straight edge, but I did a lazy version:

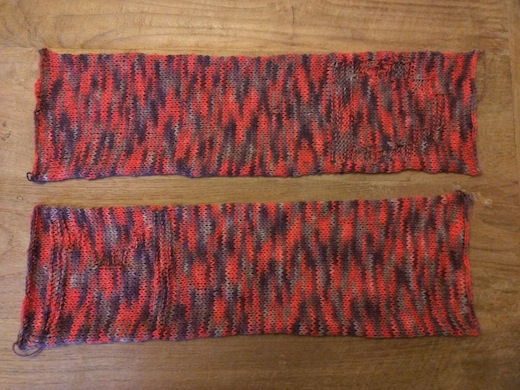
I think they came out ok. You can see a certain amount of twisting up around the edge, but that's just what stockinette does, apparently. If I don't want that I have to put some fancy edging on. I'll live.
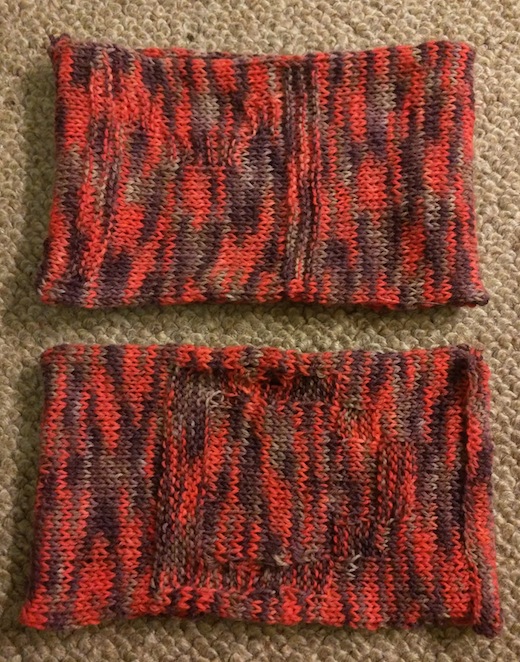
Finally, I stitched up the edge to create the loop, and I have a couple of home-made if slightly naff Christmas presents! If Daddy can knit, perhaps this will convince the children that women can be astronauts and doctors....
Posted 2015-12-16.
Corruption
I was in the mood for another Magnetic Scrolls adventure, and had tried to get into this a few times before without much success, so I had another go at Corruption. I did make a fair amount of progress, before trying to work out if the hospital section was a red herring or not, and finishing off the game with a walkthrough.
As you might guess from that, the game did not utterly enthrall me, even if it was reasonably fun! It's actually a rather small game, compared to Guild of Thieves or Jinxster. The trickiness is in how the game is heavily time-oriented, with certain events happening at certain times. You need to be at the right place at the right time to collect all the evidence you need to show your innocence.
As such, it's actually much more of a scavenger hunt text adventure than it initially looks. On the other hand, the way to find out what you need to do, when, seems to largely consist of following people around, or hanging around seeing what happens at particular times, in order to construct the correct walk-through. In other words, to complete the game, you must make notes from other runs, and then make the character act like a psychic. I'm not a great fan of this approach.
Finding the "treasure" was in a few cases counter-intuitive, as you must not only work something out, but make the evidence obvious to your player character. In other cases, it was simply a bit obscure.
There's a fair amount of filler in what is even then a fairly small game. Irrelevant locations abound, as do red herring NPCs. Compared to GoT and Jinxster, it's a real disappointment. It's very much not a game I'd want to try to complete without a walkthrough, but it's reasonably fun for a quick explore with hints.
Posted 2015-11-23.
A frame for my cross-stitch
So, some time ago, I did my Head Over Heels cross-stitch, but I never found a nice way of presenting it and protecting it from the elements. No standard picture frame would fit. And now I have a frame!
Work has a "Makers Lab", and my original plan was to use the little CNC milling machine to make the appropriate shape (a hole on the front and a recess on the back). Fortunately, an experienced guy turned up, and advised me it would be slow and a relatively steep learning curve to do that (I should start off with playing about with other stuff using foam first, to get experience). Instead, I was pointed back to the laser cutter.
I was already going to use the laser cutter to cut the window, from some spare 3mm transparent acrylic. So, I broke the rest of the design into a set of 3mm layers, and laser cut some 3mm ply for the frame shape plus a stand. I stuck it all together with copydex (probably the wrong adhesive!), and this is the result.

I really am pretty happy with it. I considered painting it, but Caroline rather liked the raw laser-cut look. This now sits happily on my desk at work, where no-one has expressed the slightest interest. There we go.
Posted 2015-11-21.
Haskell + Laser = Penrose
I've always wanted a set of Penrose tiles, and now I've made some! I wrote a small Haskell program to generate a regular tessellation of kites and darts (not a Penrose tiling) as an SVG, and then used the laser-cutter at work to cut the shapes out of 3mm perspex. I actually cut out a full blue set (kites and darts) and a full yellow set (kites and darts), and mixed them, so I now have two sets! One for home, and one for work.
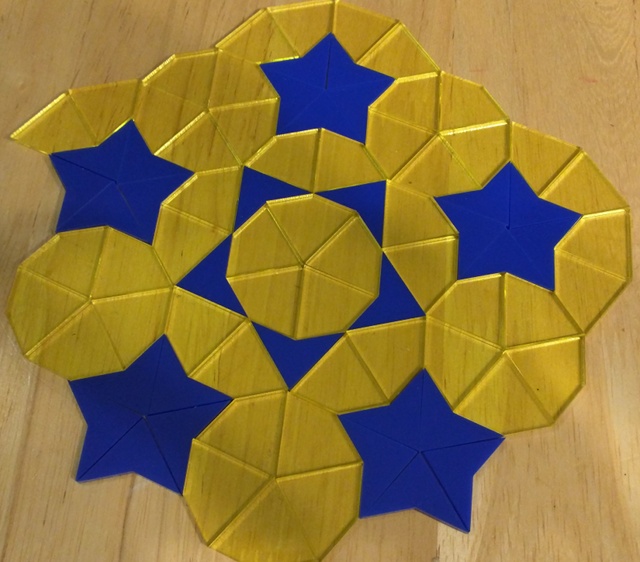
I learnt a couple of things: 1. The ratio of kite and dart pieces in use tends to the golden ratio. I've cut out the pieces in a 1:1 ratio, and end with some spares. 2. Putting the pieces into a Penrose tiling is not quite as easy as you'd think. 3. But it's kinda addictive! I'm most tempted to cut out a pile more in order to be able to make bigger patterns.
Posted 2015-10-11.
Finishing the plane
I've finally finished the model aeroplane that I posted about previously. Actually, I finished it a while ago, but I've only now got the energy back to post!

It turns out that the later and later stages of model aeroplane construction are less and less rewarding, at least for me! Gluing wood into shape is fun, covering with paper is fiddly, and decoration is tedious and when I do it, it produces underwhelming results. Still, it is done.
It's been undercoated, painted, details drawn on, decals applied, varnished and final features added. Final features first: I tacked on the antenna as a somewhat ad hoc extra, and the cockpit was made from painted balsa strips, since the original plastic cockpit somehow was crushed. Varnishing was the same as painting.
Decals were just like the "soak in water and slide onto surfaces" transfers you'd get in cereal packs in the '80s. They still have a tendency to tear, and they don't look great, but they're ok. I drew the edges of control surfaces on with a pen and ruler, which just reveals how poor I am with a pen and ruler. And then the lines ran a bit when water from the decals got on them. I guess the lesson is to do decals before lines.
The main faff was the painting. Rather sillily, I did it with an airbrush. I wanted the best finish I could manage with my limited skills, and, hey, I got to play with a new tool and attempt to learn a skill and understand the technology. Airbrushing is pretty fun, but I'm... not skilled with it. I got a cheapy airbrush, which wouldn't help, but it's easy to get it to clog up, and condensation can make it end up somewhat sputtery.


Still, it's done now!
Posted 2015-10-10.
DIY laptop case
I've finally finished the DIY laptop case project that I'd been working on, and moreover had the time to recover from it.
The plan was to create a fabric case for my ancient Macbook Air, with the external cover using pinstripe fabric at an angle, and the inside using a patchwork of Clarissa Hulse fabric.
Overall, I'm pretty happy about the result, although I'll admit the quality of work's not great:


After comparing a few alternatives, the design I used came from here. I decided on a plastic zip so as not to damage the notebook, and learnt far too much about the varieties of zip design before promptly forgetting it all. I decided to go for a nice chunky zip in bright orange as a bit of a contrast to quiet pin-stripe.
Anyway, I was never going to produce a result as good as someone with proper sewing experience, and as I'm making a one-off the lessons I learnt are somewhat lost, but I really wanted to create my design myself, and, well, it was an interesting learning experience. :)
Here are some things I learnt:
- Working with fabric is hard. Constructing something that's the right shape from wood might be difficult, but when the material keeps changing shape, scrunching up, stretching, etc., it's a right pain.
- Also, you're kind of expected to create more complex shapes - the fabric will have changes of direction and rounded corners, whereas with other materials you can just leave it all nice and square. In short, smooth corners are hard.
- Clarissa Hulse fabric off-cuts patch-worked together produced the effect I wanted. We considered the fabric for curtains, but big, expensive silk curtains would have been destroyed by the children by now, so not doing that was a good move.
- Chunky zips are a right pain. They want to lie flat. They certainly don't want to be part of a 180 degree turn-around at the edge of the case. They come with chunky strips of heavy-duty material attached, in order to zip big, heavy things effectively, and that's really bad for this kind of application. I trimmed off what I could, especially at the ends, which helped somewhat.
- Don't let people close. The finishing, especially around the corners of the zip, is bad.
Despite all that, it was a fun project.
Posted 2015-08-15.
My ill-considered thoughts on golang/go
They try hard to make Go not hard. They leave out hard things, and say to do things in a not hard way. They have strong views and are very clear as to how to write good things in Go.
It has strict types as weak types are bad, but poor strict types as good strict types are too hard. So, I can't make my own safe map that holds a type A or a type B. But Go has maps built in. Could this be why? Poor types make me sad.
When I write Go, it feels like all short words of one sound. And they say this is like how to speak to a small child. And I shake my head, I give up.
Writing Go feels like writing using only monolsyllabic words because somebody heard that you should make things easy to explain to a child, and short words are easy. Of course, you don't speak to a child with monosyllables, you speak simply and clearly.
I read a paper once that tried to explain the problems with Kelly criterion, using words of one syllable. It was doing that to be condescending, and unsurprisingly it just made the arguments more obscure. Go feels like that to me.
Fundamentally, Go is retro-futuristic. If you want a language in the footsteps of C and Awk, if you were clobbered with C++, Java and Python and wanted the future Bell Labs promised you, this is is the language for you.
However, the changes don't really progress beyond the '80s. The way of representing types is perhaps an improvement on C, but is just stupidly weak beer compared to, say, what Haskell gets up to. Knowing what's immutable through constness or values just assigned once is great. Go does not have that. It has pointers. Pointers with "nil" values allowed. As mentioned above, no sane generics.
The interface model is insane but fun. It's not what I'd put in a strictly-typed language. Pointers allow out and in-out parameters, but you can also return tuples... but there are no tuple types.
Mind you, tuple types might encourage you to factor out common functionality, such as error-handling. All error-handling should be as long-winded and tedious as possible, as otherwise you're not doing it right. (In a similar vein, you should be writing full explicit error messages for when your unit tests fail. Having a compact way of expressing your invariants is not the proper grind.) Exceptions are bad, because people don't use them properly. Of course, in C people always checked returns codes, so I can see why they have returned to this approach.
Except, of course, that they do have exceptions, wrapped up under a different name and twisted up so that you're not tempted to use them. I do rather like "defer", though, which is almost as good as actually having RAII or some other "with" structure.
The channel-based communications mechanisms and go-routines are nice. Conceptually not new to users of Occam or Erlang.
Everything I see in Go, I see condescending design choices made by someone with confirmation bias. They've cleared away all that is bad in modern languages, returning to and enhancing those things that are good. And ignoring all the things that are clever and different.
In some ways, the name says so much. A clear lesson from everything else is "Choose a name that is easily googled". However, this knowledge comes from after 1990, and the thing's called "Go".
What would I use instead? I'm a bit of a Haskell nut, despite its deficiencies. I expect ocaml is pretty good, but need to look into it. I'm getting increasingly interested in Rust.
To be perfectly honest, it does well as a deliberately mediocre language. It's probably quite good as a first language - better than Python at any rate. In the end, what grinds me down about it can be described in two words: parochial condescension.
Posted 2015-08-11.